 |
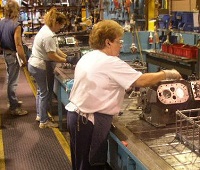 |
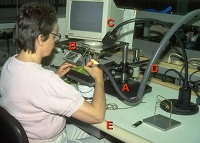
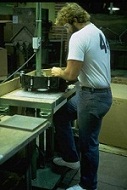
| Stationary work bench | Flexible positions on moving line |
A workstation is a work area set up for an individual person. The focus here is the industrial workbench or a production line, but a workstation can include a wide range of settings such as the work area for a machine operator or the cab for a heavy equipment operator. A workstation can be for sitting or standing work and can include surrounding items and features, such as the floor surface on which the individual stands.
The problem with a generic workbench
The traditional approach for setting up workstations is to start with a generic workbench and more or less plunk down the equipment, materials, and tools needed to do the job. A workbench like this can be fine in some settings, like a maintenance shop where a variety of different tasks are performed on different types of items,
However, when the work involves high-volume production, intricate tasks, or specialized operations, the traditional approach can create hindrances that waste time, lead to defects, and even create long-term disorders like back injuries or shoulder problems.
It is normally better to design a specialized workstation in these circumstances. The first rule of design “form follows function” applies here — first understand the task that you need to accomplish, and then design for that.
In essence, you start by defining the optimal orientation and the best fixture to hold an item. From there, you work “outward” to provide for parts handling, tools, and other needed equipment.
Steps
Step 1 — Define the optimal height and orientation
The first step is the one that is most often neglected, which is to understand the optimal orientation for the product relative to the employee who does the work. Sometimes the best position for the product is horizontal, but more commonly a product is best accessed when it is at a slant. Likewise, sometimes the product can stay in the same orientation for all the steps of the job, but more commonly different tasks are best done with the product in a different orientation, especially when the product is complex.
To be sure, it may not be feasible to provide optimal orientation for each and every step of a job. However, knowing how the product can best be positioned provides critical design objectives. If you don’t know what you’re aiming for, you can end up creating a workstation that contains inadvertent barriers to production and quality, and in addition cause wear-and-tear injuries among employees.
Consequently, for each step of the job, ask these questions:
Access — Can employees access what they need in order to do the job efficiently?
Visibility — Is it possible to see what they need?
Working position — Will employees be in the optimal working position to do the work?
As you start out, do not be overly concerned about how to actually support or move the item — that comes next. The point is to define the ideal height and orientation to do the work: if you could do anything you wanted, where should the work be?
To help you answer these questions, consider the following:
Assume you have supernatural powers and can manipulate the product in the air with mental telepathy. Envision what you need to do. Think through all the different orientations that are possible and the logical implications of each.
Create a mock workstation with a highly adjustable test fixture for the item you’re working on. You (and others) can work at this station and test different orientations to help identify the best positions.
Watch videotapes of the work as it is being performed. It is common to see things on a video that you don’t see in the workplace, especially if you watch the video clip several times in succession. The difficulties that people have when doing the job help you determine how best to position the work. It can be helpful to involve employees and supervisors in this process.
Learn about the basic principles of ergonomics to help understand your objectives, especially the optimal working positions that enable the most strength, dexterity, and personal well-being.
Step 2 — Identify a fixture or holder
Once you understand the optimal height and orientation of your specific situation, then turn to the practicality of how to achieve it. It could be a type of bench top fixture, a floor fixture, a conveyor workstation, or anything that you can think of. You may need height adjustment. If you need a work surface, the surface size may be smaller than you think, or it might be a slanted surface. Surprisingly, you may not need an actual surface at all.
You may need to brainstorm a bit (or a lot, depending upon the circumstances). The purpose for providing the various options in the linked pages is to help you think outside the box. You want to make sure you identify what works best for the situation, rather than what is familiar.
Examples
 |
 |
 |
 |
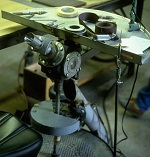
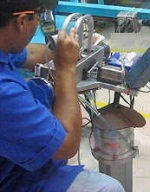
| Unique potter’s wheel workstation | Highly adjustable pedestal workstation | Electronics workstation | Workstation made from die cart |
Step 3 — Determine material handling requirements
Determine requirements and options for parts movement at the workstation. Consider parts movements within the individual workstation and between workstations, including loading and unloading methods, parts presenters, and height relationships within the equipment. Your goal is minimize the time and effort needed to move items around. Equalizing heights can especially be helpful, since it may allow you to slide materials from place to place, rather than needing to pick them up. (See also Ways to improve material handling and the Material handling knowledge base.)
Step 4 — Define tool and material needs and their location
What tools and materials do you need to do the job? What workstation layout do you need so that each item is handy? What storage features right at the workstation do you need, i.e. supports, holders, racks, etc.? You need to define a place for everything and make sure it is in the right place. (See also All about hand tools [future] and the Hand tool knowledge base [in development]).
Step 5 — Review other issues for applicability:
The final step involves reviewing of a series of other ergonomics issues. Evaluate each of these topics as appropriate for your task:
Visual access is part of Step 1 for the item being worked on, but can include other parts of the workstation such as dials and computer monitors. The question is if what you need to see is in your line of sight.
Lighting is closely related to visual access, but has to do with issues like darkness and glare rather than line of sight.
Magnification is again related to visual access, but the question is if it would be helpful to enlarge the view of items.
Arm supports may be needed to provide proper support for the arms and hands in certain tasks.
Surface material — depending on the task, different types of surface material can be helpful: slippery, high friction, non-glare, etc.
Clearance is needed for your arms, legs, and other parts of the body. Additionally, there must be room for tools, headgear, gloves, and similar items that are used.
Sit-stand — in stationary jobs, it is best to alternate between sitting and standing, rather than doing either all day long. A range of techniques is available to
Seating is obviously important for certain types of work.
Flooring issues are equally important for standing work.
Snding platforms are sometimes needed to raise people up to a better work height.
Footrests can be beneficial — and critical in some situations — whether sitting or standing.
Point: Summary of design process
There are many checklists and evaluation tools available to help you evaluate these issues, including a basic checklist on this site. The point of this page is to provide guidance when you start from scratch in setting up a new workstation.
In sum, you start with the orientation of the product and the fixture needed to enable this orientation. Then you move “outward” to how the materials are moved in and out of the fixture, then to the tools and storage items that you need, and then to the other aspects of the workstation. Everything is based on the ability of the employee to do the job well, with minimal time and effort.
Workstation vs. Production Line
A production line is essentially a sequence of workstations that are connected one way or another with material handling systems. Consequently to set up a production line, you basically repeat this process multiple times.
The challenge is when different tasks along the production line are best done with the product in different heights and orientations. In many operations, such as automobile assembly, specialized conveyors and work positioners have been developed to rapidly move the cars into different orientations as they move down the line. Similar approaches can be made elsewhere.